How to use SulamX Pro
The complete guide to installing, reading and configuring SulamX Pro inside TradingView.
- Find it and keep it handy. After your access is granted, SulamX Pro lives under Indicators → Invite-only scripts. Click the star beside it once and it moves to Favorites, so from then on it is two clicks onto any chart.
- Check the clock. The session shading and the restricted-hours filter follow the timezone your chart is set to. Set the chart to your own timezone once (bottom-right of the chart, or Chart settings → Symbol → Timezone) and everything lines up.
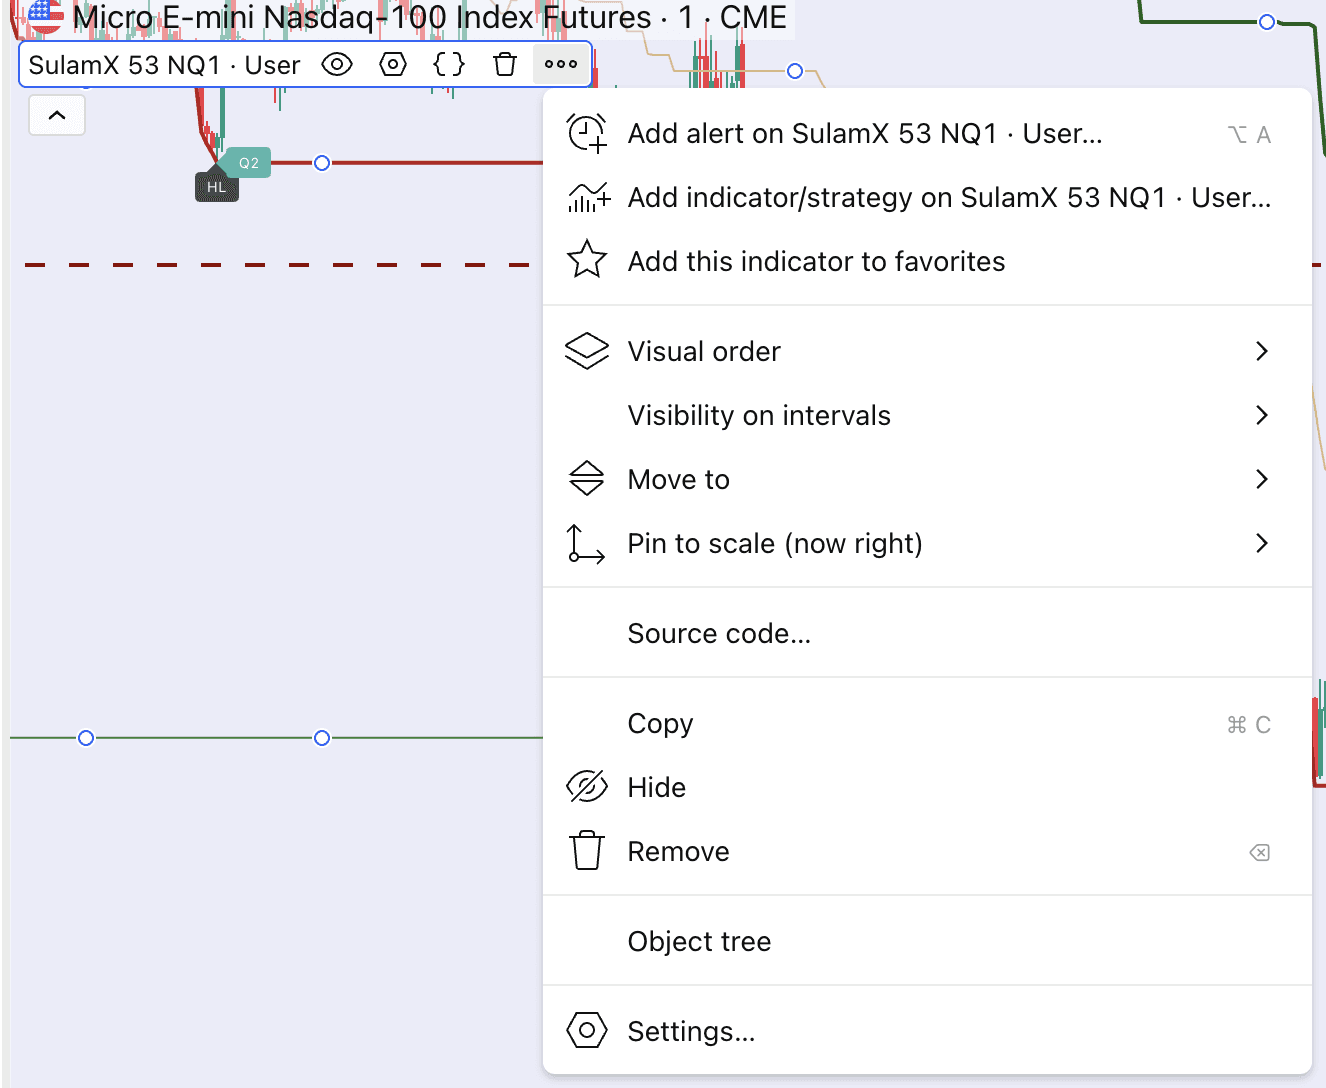
- Create one alert. Right-click the SulamX Pro name in the chart legend → Add alert → set it to Once per bar close → tick Notify on app. Chapter 3.4 walks through it click by click.
- Leave the settings alone. The defaults are calibrated. The one thing worth changing: if you trade more than one contract, turn on Partial TP1 so the first target closes part of the position. On a single contract it makes no difference — leave it off.
- When a new version ships, rebuild your alert. An alert is bound to the exact version of the script it was created on, so it keeps firing from the old one. Delete the old alert and create a fresh one on the updated indicator. This takes a minute and we will tell you when it applies.
New to TradingView?#
Start here if you have never used TradingView. This chapter takes you from no account at all to a chart that is ready for SulamX Pro.
0.1What TradingView is — and what SulamX Pro is#
TradingView is the charting platform. It is an independent company that shows live market prices, draws the charts, runs the alert servers, and connects to brokers. Over 100 million traders and investors use it. It is not ours.
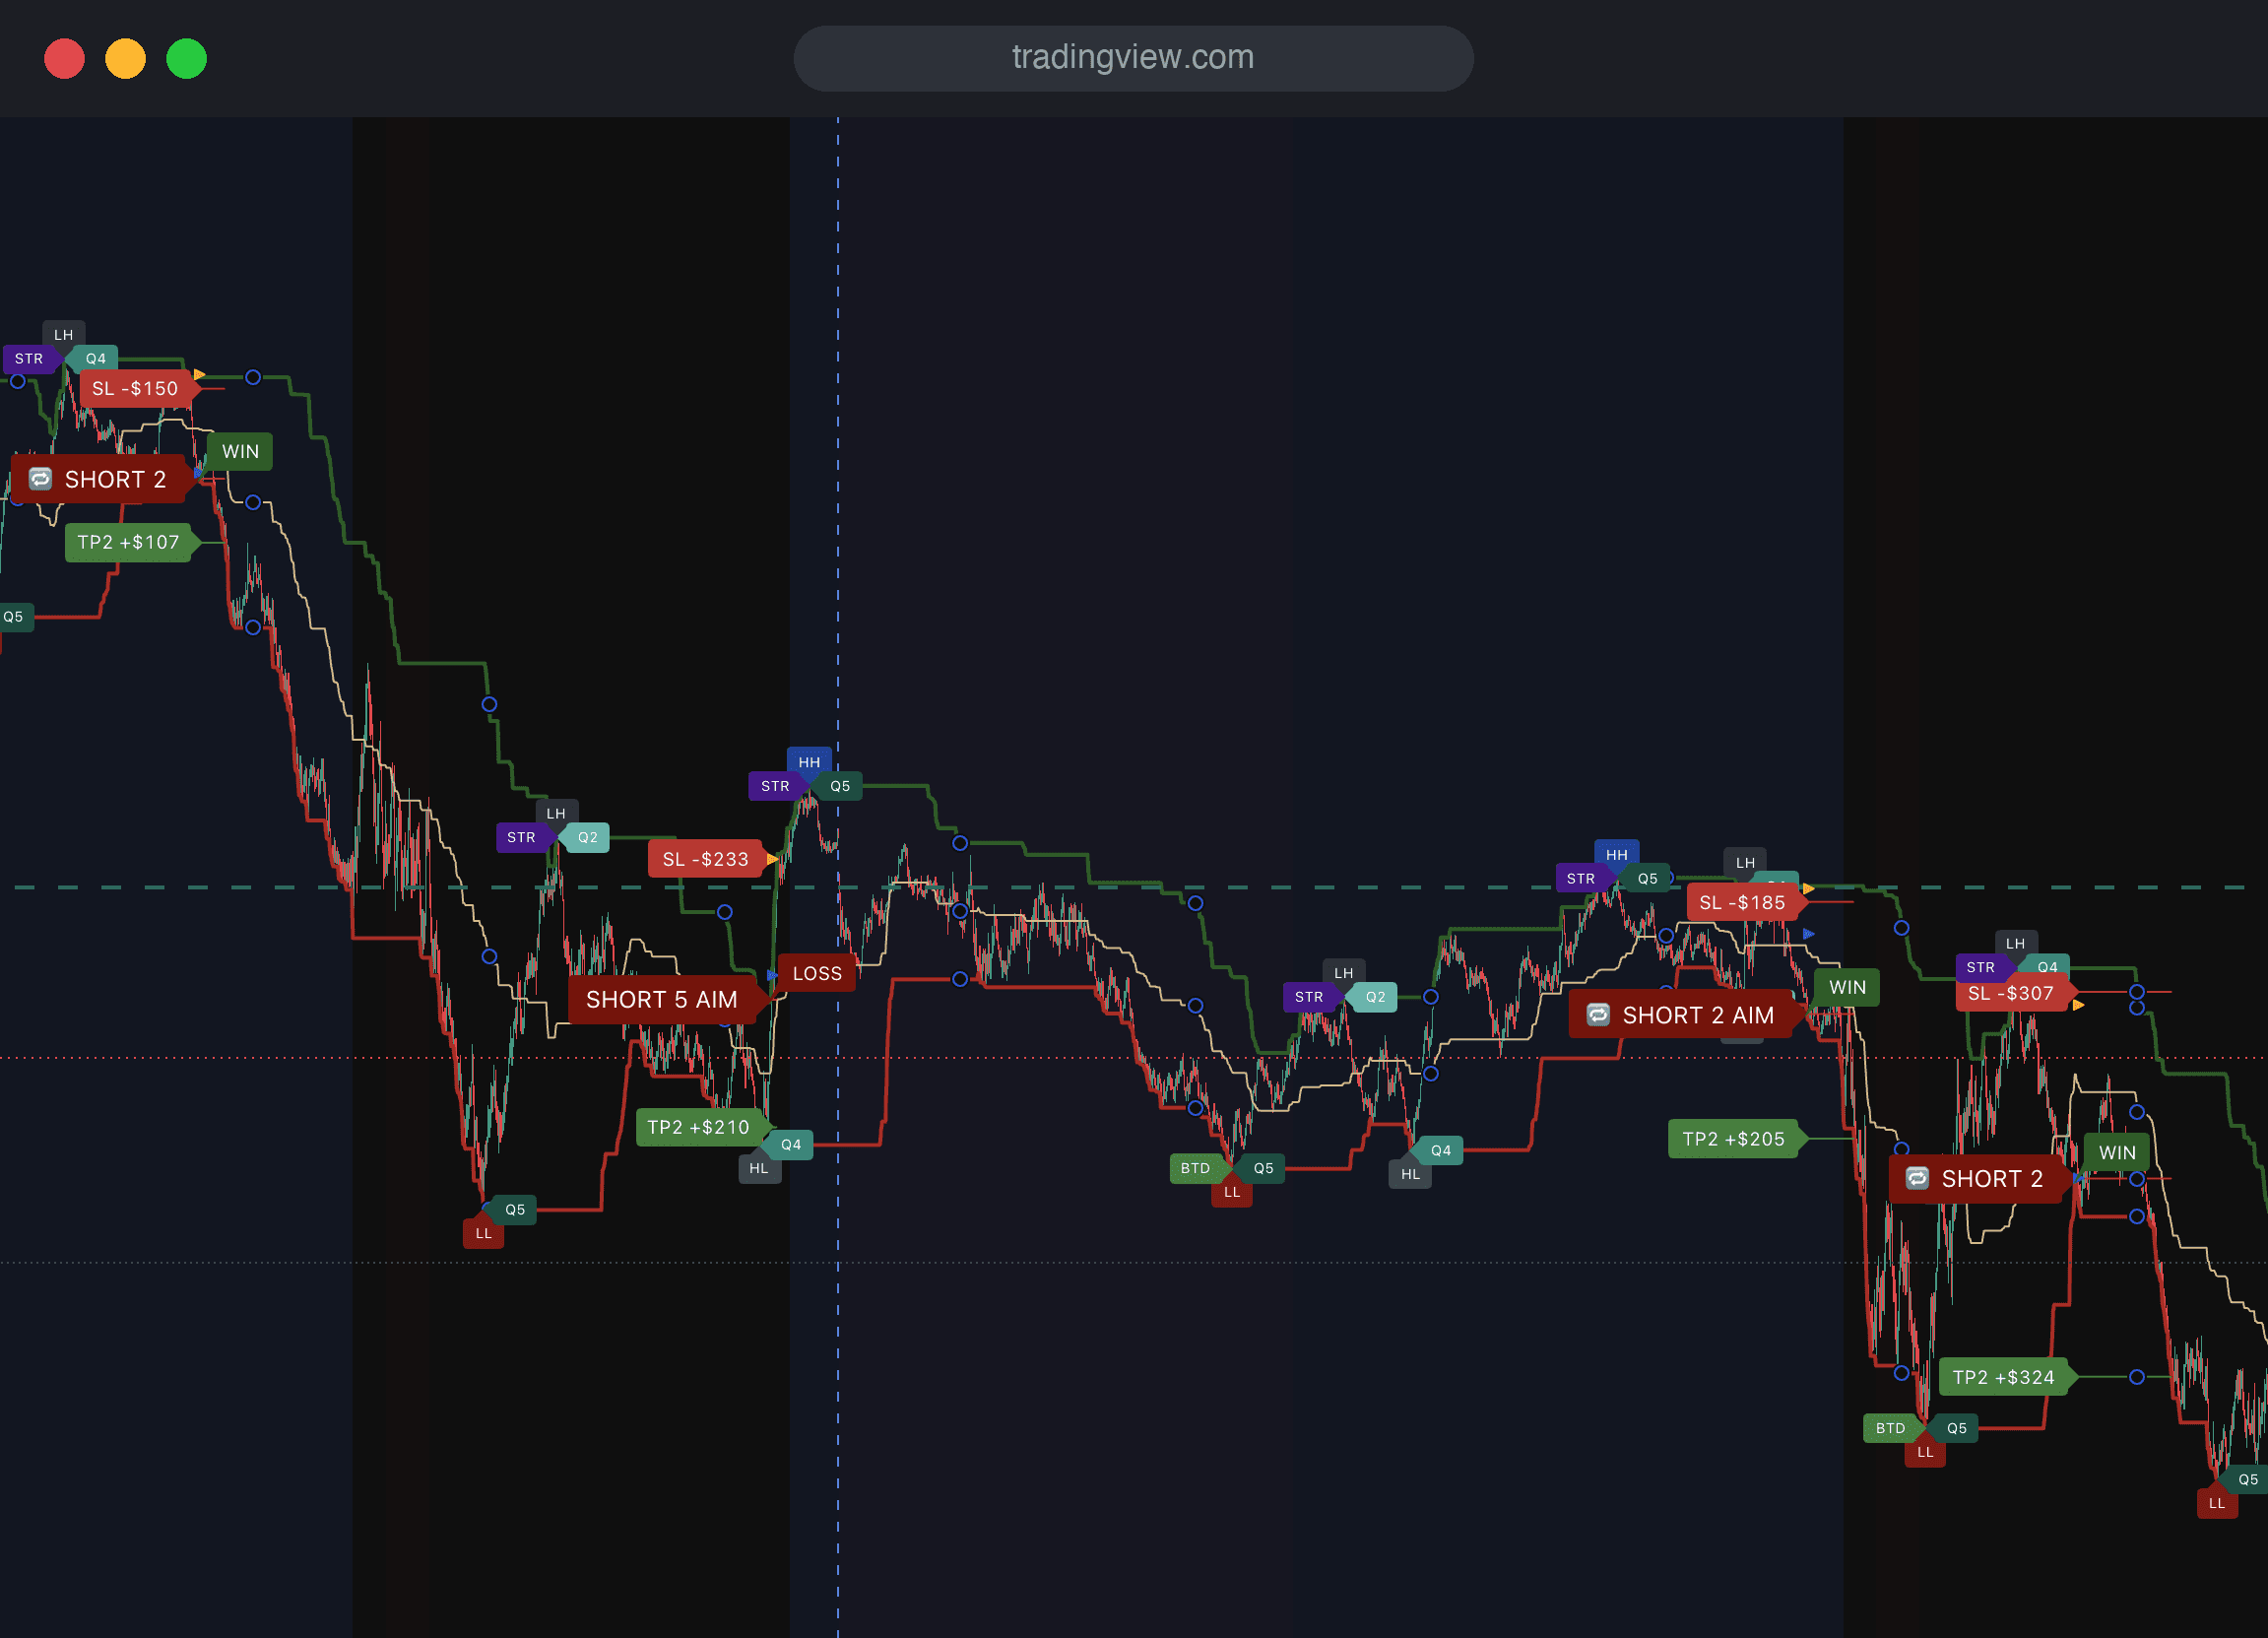
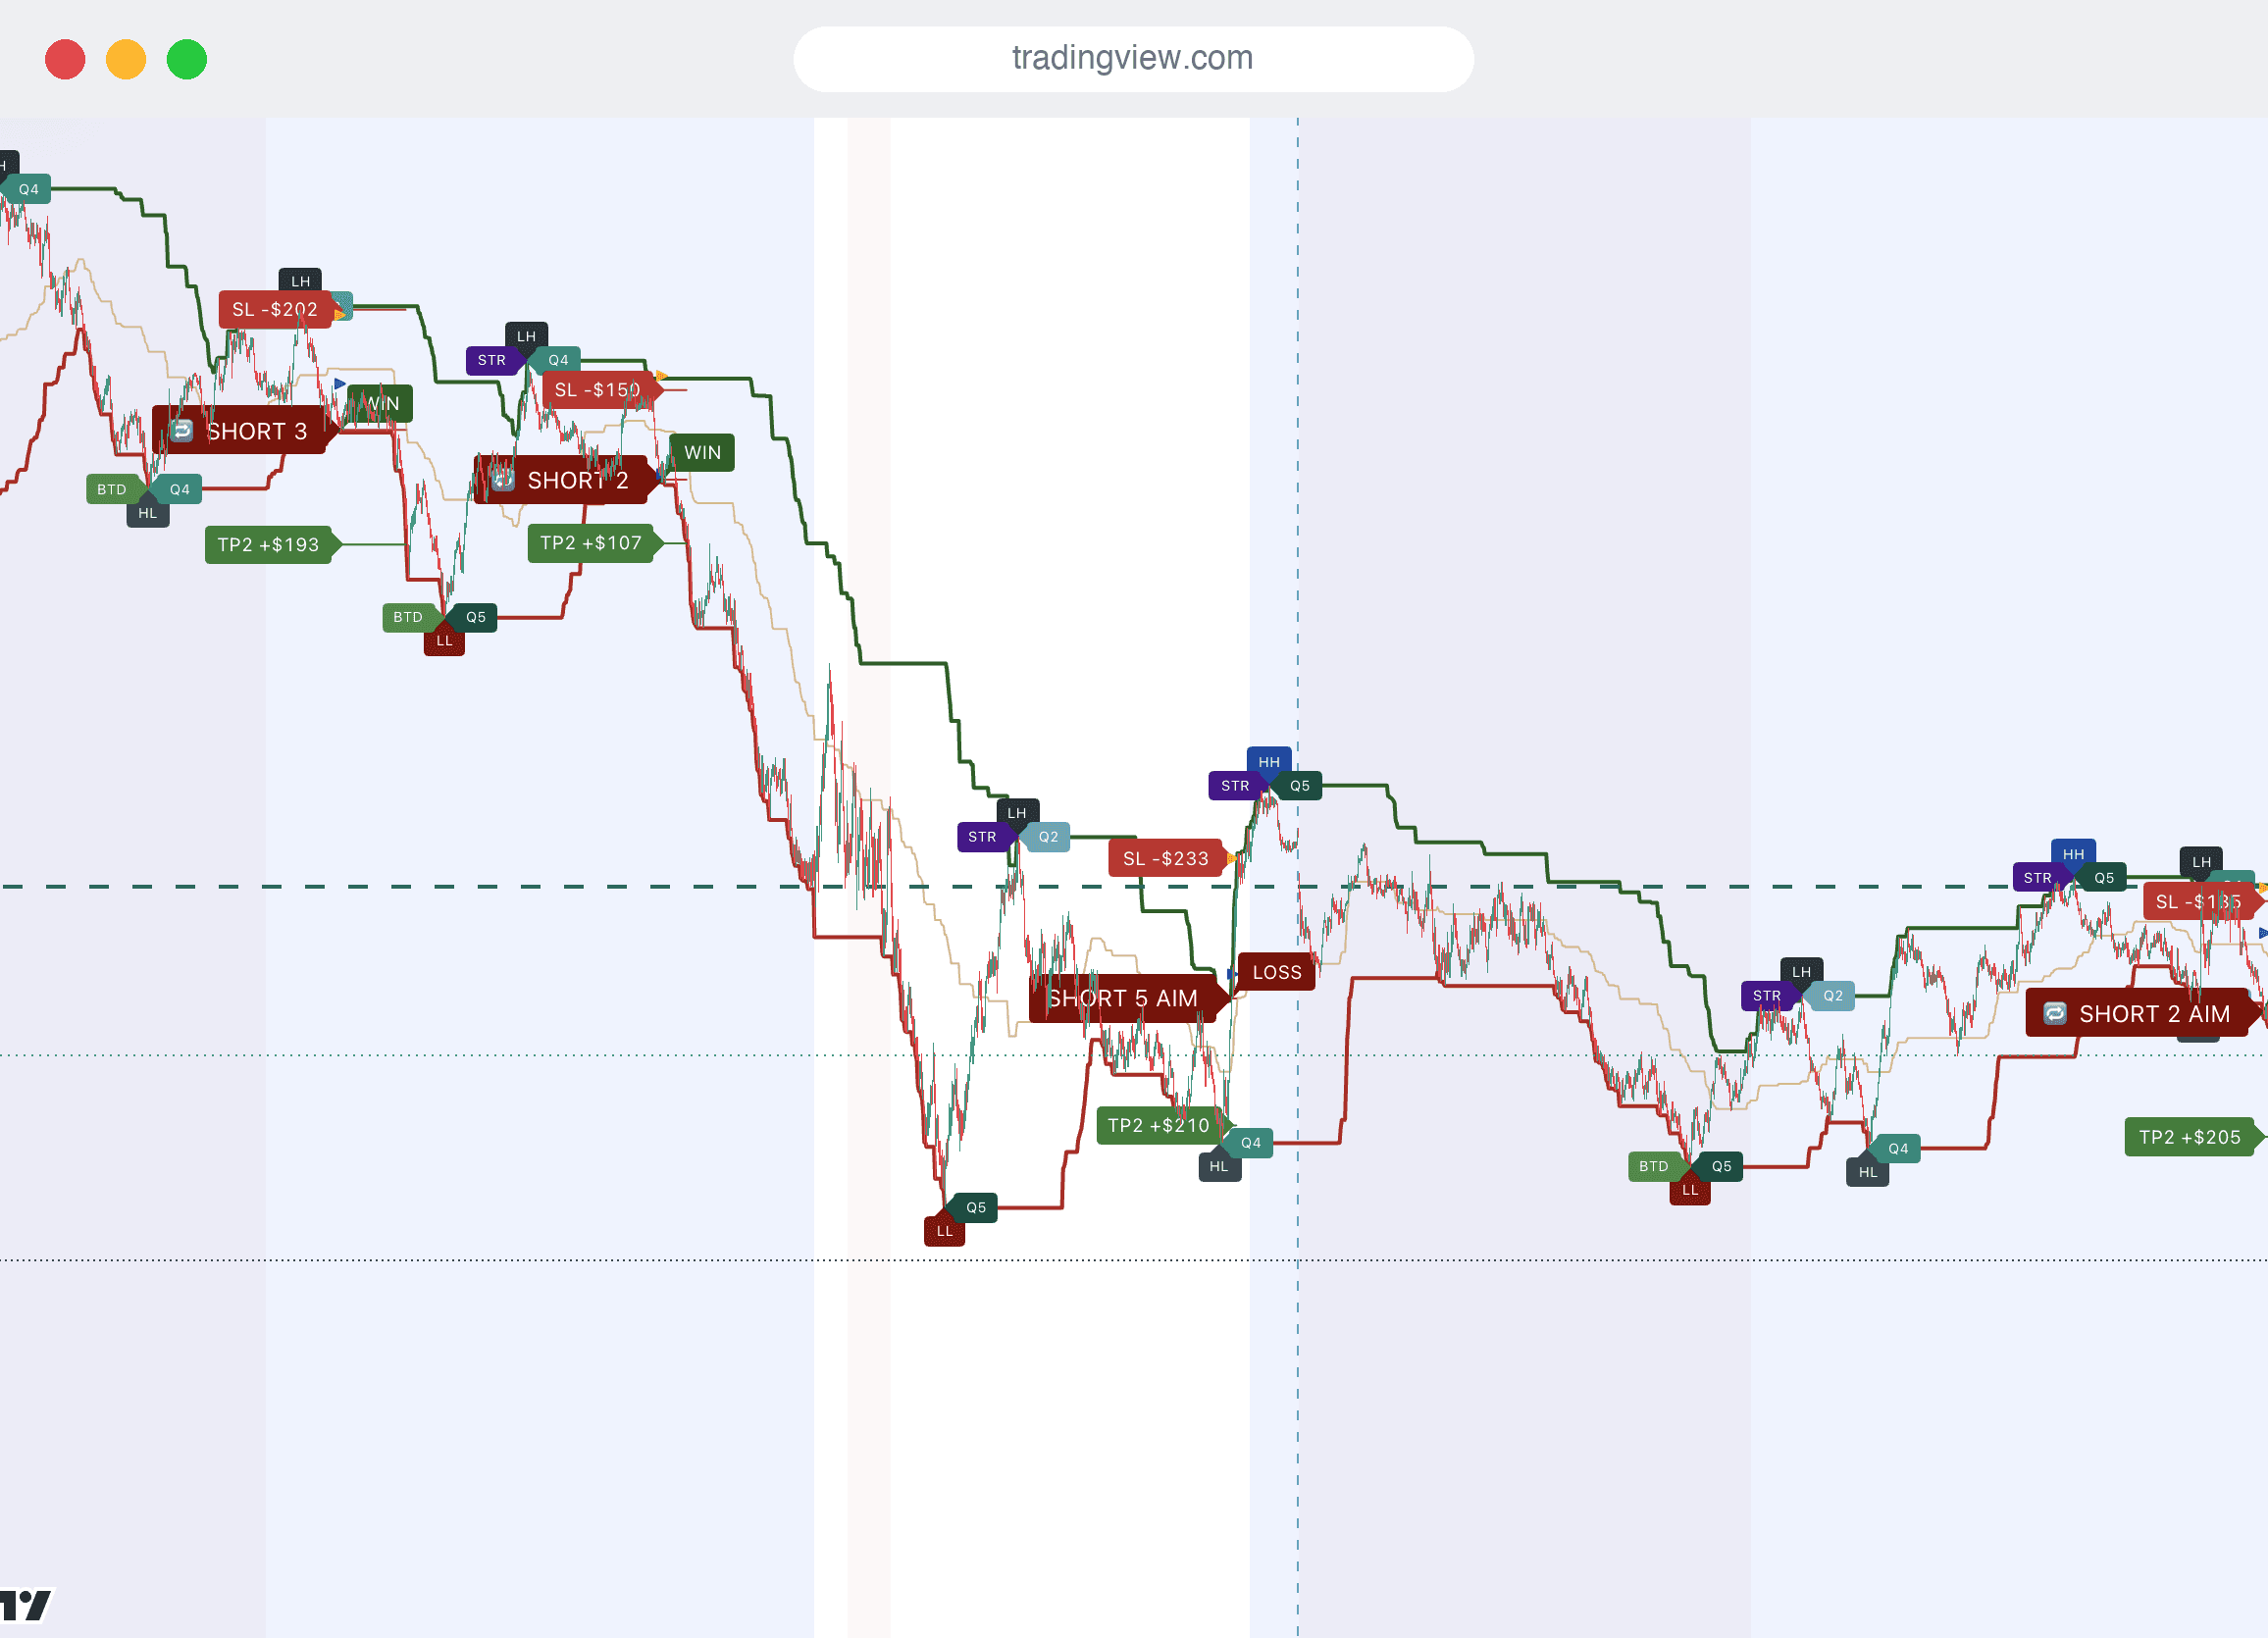
SulamX Pro is an indicator — a script that loads on top of a TradingView chart and draws our analysis onto it. Think of TradingView as the screen and SulamX Pro as the layer we add to it. A visual breakdown of everything it draws is on the features page, and the blog covers how to read market structure and build a routine around it.
0.2Opening a TradingView account and choosing a plan#
- Go to
tradingview.comand choose Get started. You can sign up with an email address, or with Google or Apple. - Pick a username. Write it down exactly as you typed it — this is the one piece of information we need from you to grant access, and it is case-sensitive. It is not your email.
- Confirm your email address. Alerts by email will not work until you do.
Which plan do you need? To receive an invite-only indicator and put it on a chart, the free Basic plan is enough. There is no minimum paid tier for access. What the paid tiers buy you is headroom — mainly how many alerts you can keep running at once and how long they stay alive before expiring.
| Plan | Technical alerts | Alert lifetime | Good enough for SulamX Pro? |
|---|---|---|---|
| Basic (free) | 20 | 1 month | Yes — you can run it and get alerts. |
| Essential | 20 | 2 months | Yes. |
| Plus | 100 | 2 months | Yes. |
| Premium | 400 | Open-ended option | Most comfortable — alerts never silently expire. |
Plan details and prices change. Check tradingview.com/pricing before you buy anything — that page, not this one, is the source of truth.
0.3Real-time data — read this before you trade#
This is the single most important setup step, and it is the one beginners miss.
There are two ways to fix it:
- Buy the CME real-time data package from TradingView. At the time of writing it is listed at USD 7.00 per month for non-professional subscribers and covers CME, CBOT, COMEX and NYMEX. It is charged on top of your plan — Premium does not include it.
- Use your broker's entitlement. If the futures broker you connect already provides you with real-time CME data, connecting that broker inside TradingView gives you real-time prices on the chart without paying twice.
How to tell which you have: open a Nasdaq futures chart. If TradingView shows a D or a delay notice next to the symbol, you are on delayed data. Fix that before you rely on a single alert.
0.4Which markets SulamX Pro is built for#
SulamX Pro ships calibrated for Nasdaq-100 futures — the micro contract MNQ and the full-size NQ. That is the market it was developed, tested and tuned on, and it is the one we recommend you start with.
The remaining CME contracts below are on the roadmap. Each one is released only after it has been calibrated on its own — a market is either properly supported or it is not listed as supported.
| Market | Micro | Full size | Status |
|---|---|---|---|
| Nasdaq-100 | MNQ | NQ | Shipping today |
| S&P 500 | MES | ES | Roadmap |
| Dow 30 | MYM | YM | Roadmap |
| Russell 2000 | M2K | RTY | Roadmap |
| Gold | MGC | GC | Roadmap |
| Crude Oil WTI | MCL | CL | Roadmap |
| Bitcoin | MBT | BTC | Roadmap |
| Euro FX | M6E | 6E | Roadmap |
Recommended chart: 1 minute. The 5-minute and 15-minute charts are supported. Nothing stops you putting it on another symbol — but outside the markets above it has not been calibrated, and we do not claim it works there.
0.5Try it first with a free demo account#
You do not have to risk money to see whether the indicator and its alerts suit you. TradingView includes a free simulated broker called Paper Trading, available on every plan including the free one.
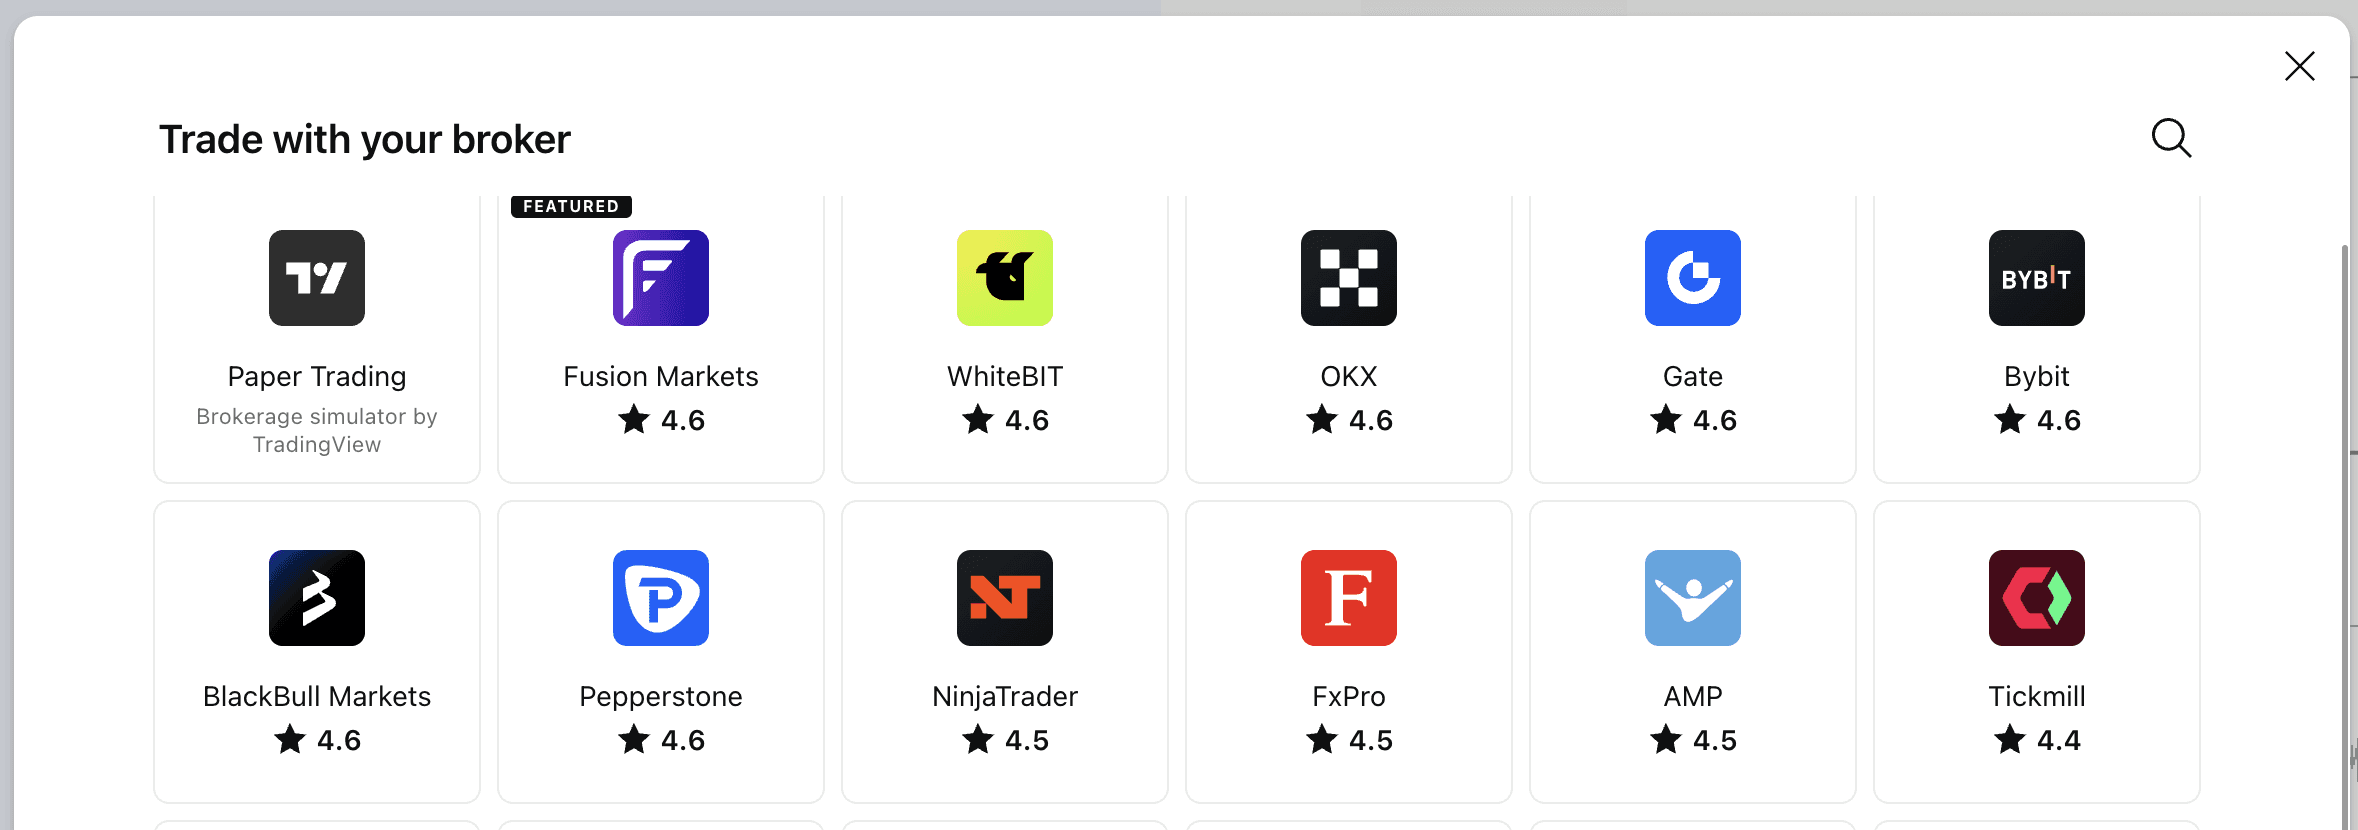

- Open a chart and find the Trading Panel at the bottom of the screen (or press the Trade button in the top toolbar).
- Paper Trading sits at the very top of the broker list. Select it and press Connect.
- Place simulated orders exactly as you would real ones — from the order ticket, from the DOM, or by dragging orders on the chart.
Bar Replay is the other free tool worth knowing — the rewind button on the chart's top panel replays past sessions candle by candle, so you can watch how SulamX Pro marked up a day that has already happened.
Getting Started#
Everything you need before your first chart — and the three steps from checkout to a working tool.
1.1What you need#
- A TradingView account (free or paid — any tier works; paid tiers allow more simultaneous alerts).
- The TradingView mobile app if you want alerts on your phone (recommended).
- An active SulamX Pro subscription.
SulamX Pro runs entirely inside TradingView. There is nothing to download or install on your computer.
1.2From purchase to access#
- Complete your purchase at sulamx.com. Payments are processed by our payment provider. Your invoice is issued in the name of SulamX Ltd. For billing or invoice assistance, contact info@sulamx.com.
- Save your TradingView username. Open your SulamX account, select Profile, and save the username from your TradingView profile — not your email address. You can add it before or after checkout. If you need help, contact info@sulamx.com.
- We grant access. SulamX Pro is distributed through TradingView's official invite-only scripts system. Once access is granted to your username, the tool appears in your TradingView account. You'll receive a confirmation email when it's live.
1.3Adding SulamX Pro to your chart#
- Open any chart on TradingView.
- Click Indicators at the top of the chart.
- Open the Invite-only scripts tab.
- Click SulamX Pro. It loads directly onto your chart.

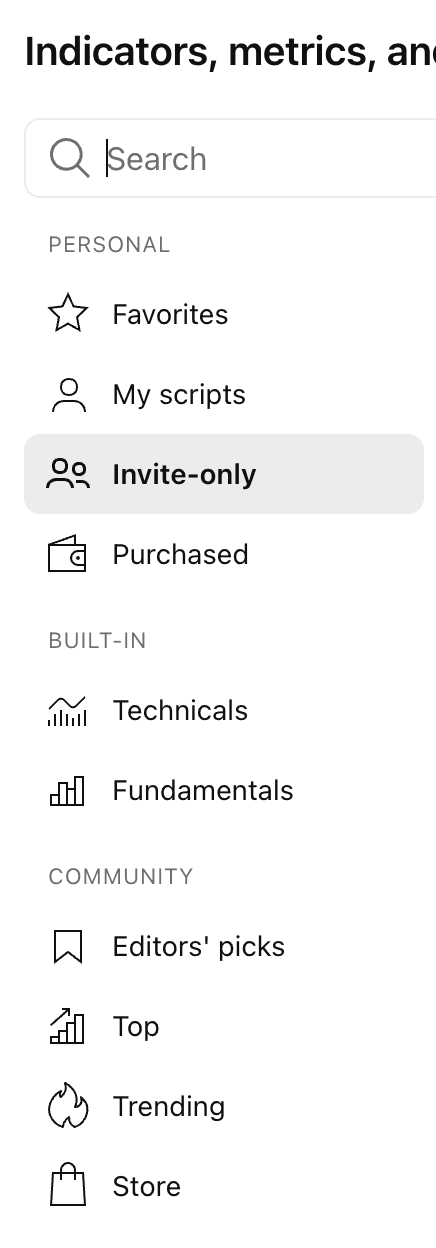
In detail, the first time you do it:
- Open a chart at
tradingview.com/chart, and set the symbol to Nasdaq-100 futures — type MNQ1! in the symbol box. Set the timeframe to 1m. - Press the Indicators button in the top toolbar. The keyboard shortcut is the forward-slash key
/. - In the left-hand column of that dialog, choose Invite-only scripts. Every script an author has granted you access to appears here — this is where SulamX Pro lives. It is not in the search results, and it is not public.
- Click SulamX Pro. It loads onto the chart immediately.
- Star it. Hover over the name in that list and click the star that appears to its left. From then on it sits in your Favorites tab and is one click away on any chart.
- Save the chart layout so the indicator is there next time you open TradingView.
1.4Recommended chart setup#
SulamX Pro is built and calibrated for Nasdaq futures:
- Symbol:
MNQ1!(Micro E-mini Nasdaq-100) — orNQ1!if you trade the full-size contract. - Timeframe: 1 minute (recommended). The tool automatically adapts its internal calculations to the chart timeframe, and the 5-minute and 15-minute charts are also supported.
- Chart type: standard candles.
That's it. Default settings are the validated configuration — you do not need to change anything to start.
Reading the Chart#
Everything SulamX Pro shows is designed to answer three questions at a glance: what is the market's structure, where is a trade setup, and how did it resolve?
2.1Entry labels — LONG / SHORT#
When the confirmation process completes, a solid label appears at the entry candle:
- Long — blue label. The setup points up.
- Short — red label. The setup points down.
The label sits exactly at the entry price and stays on the chart as a permanent record. When the trade closes, the label darkens (deep blue / deep red) so you can instantly tell open from finished trades when scrolling history.
2.2The Quality Meter (1–5 ★)#
Each entry label carries a number from 1 to 5 — the quality rating of that setup (for example, LONG 4). It grades how many of the tool's quality checks the setup passed. Higher is better. Hover over the label on desktop to see a plain-language description of that rating.
The rating is informational — it never changes which setups appear. It's there to help you weigh each event with discipline instead of treating every chart event equally.
2.3PRIME and AIM tags#
The two highest-quality confirmation patterns get a name of their own, shown inline on the entry label:
- Prime — the strongest pattern the tool tracks: the entry-range arrows and the momentum read both agree with the trade direction.
- Aim — a strong pattern: one of the two confirmations is present.
No tag simply means neither extra confirmation appeared. Like the star rating, these tags are informational only.
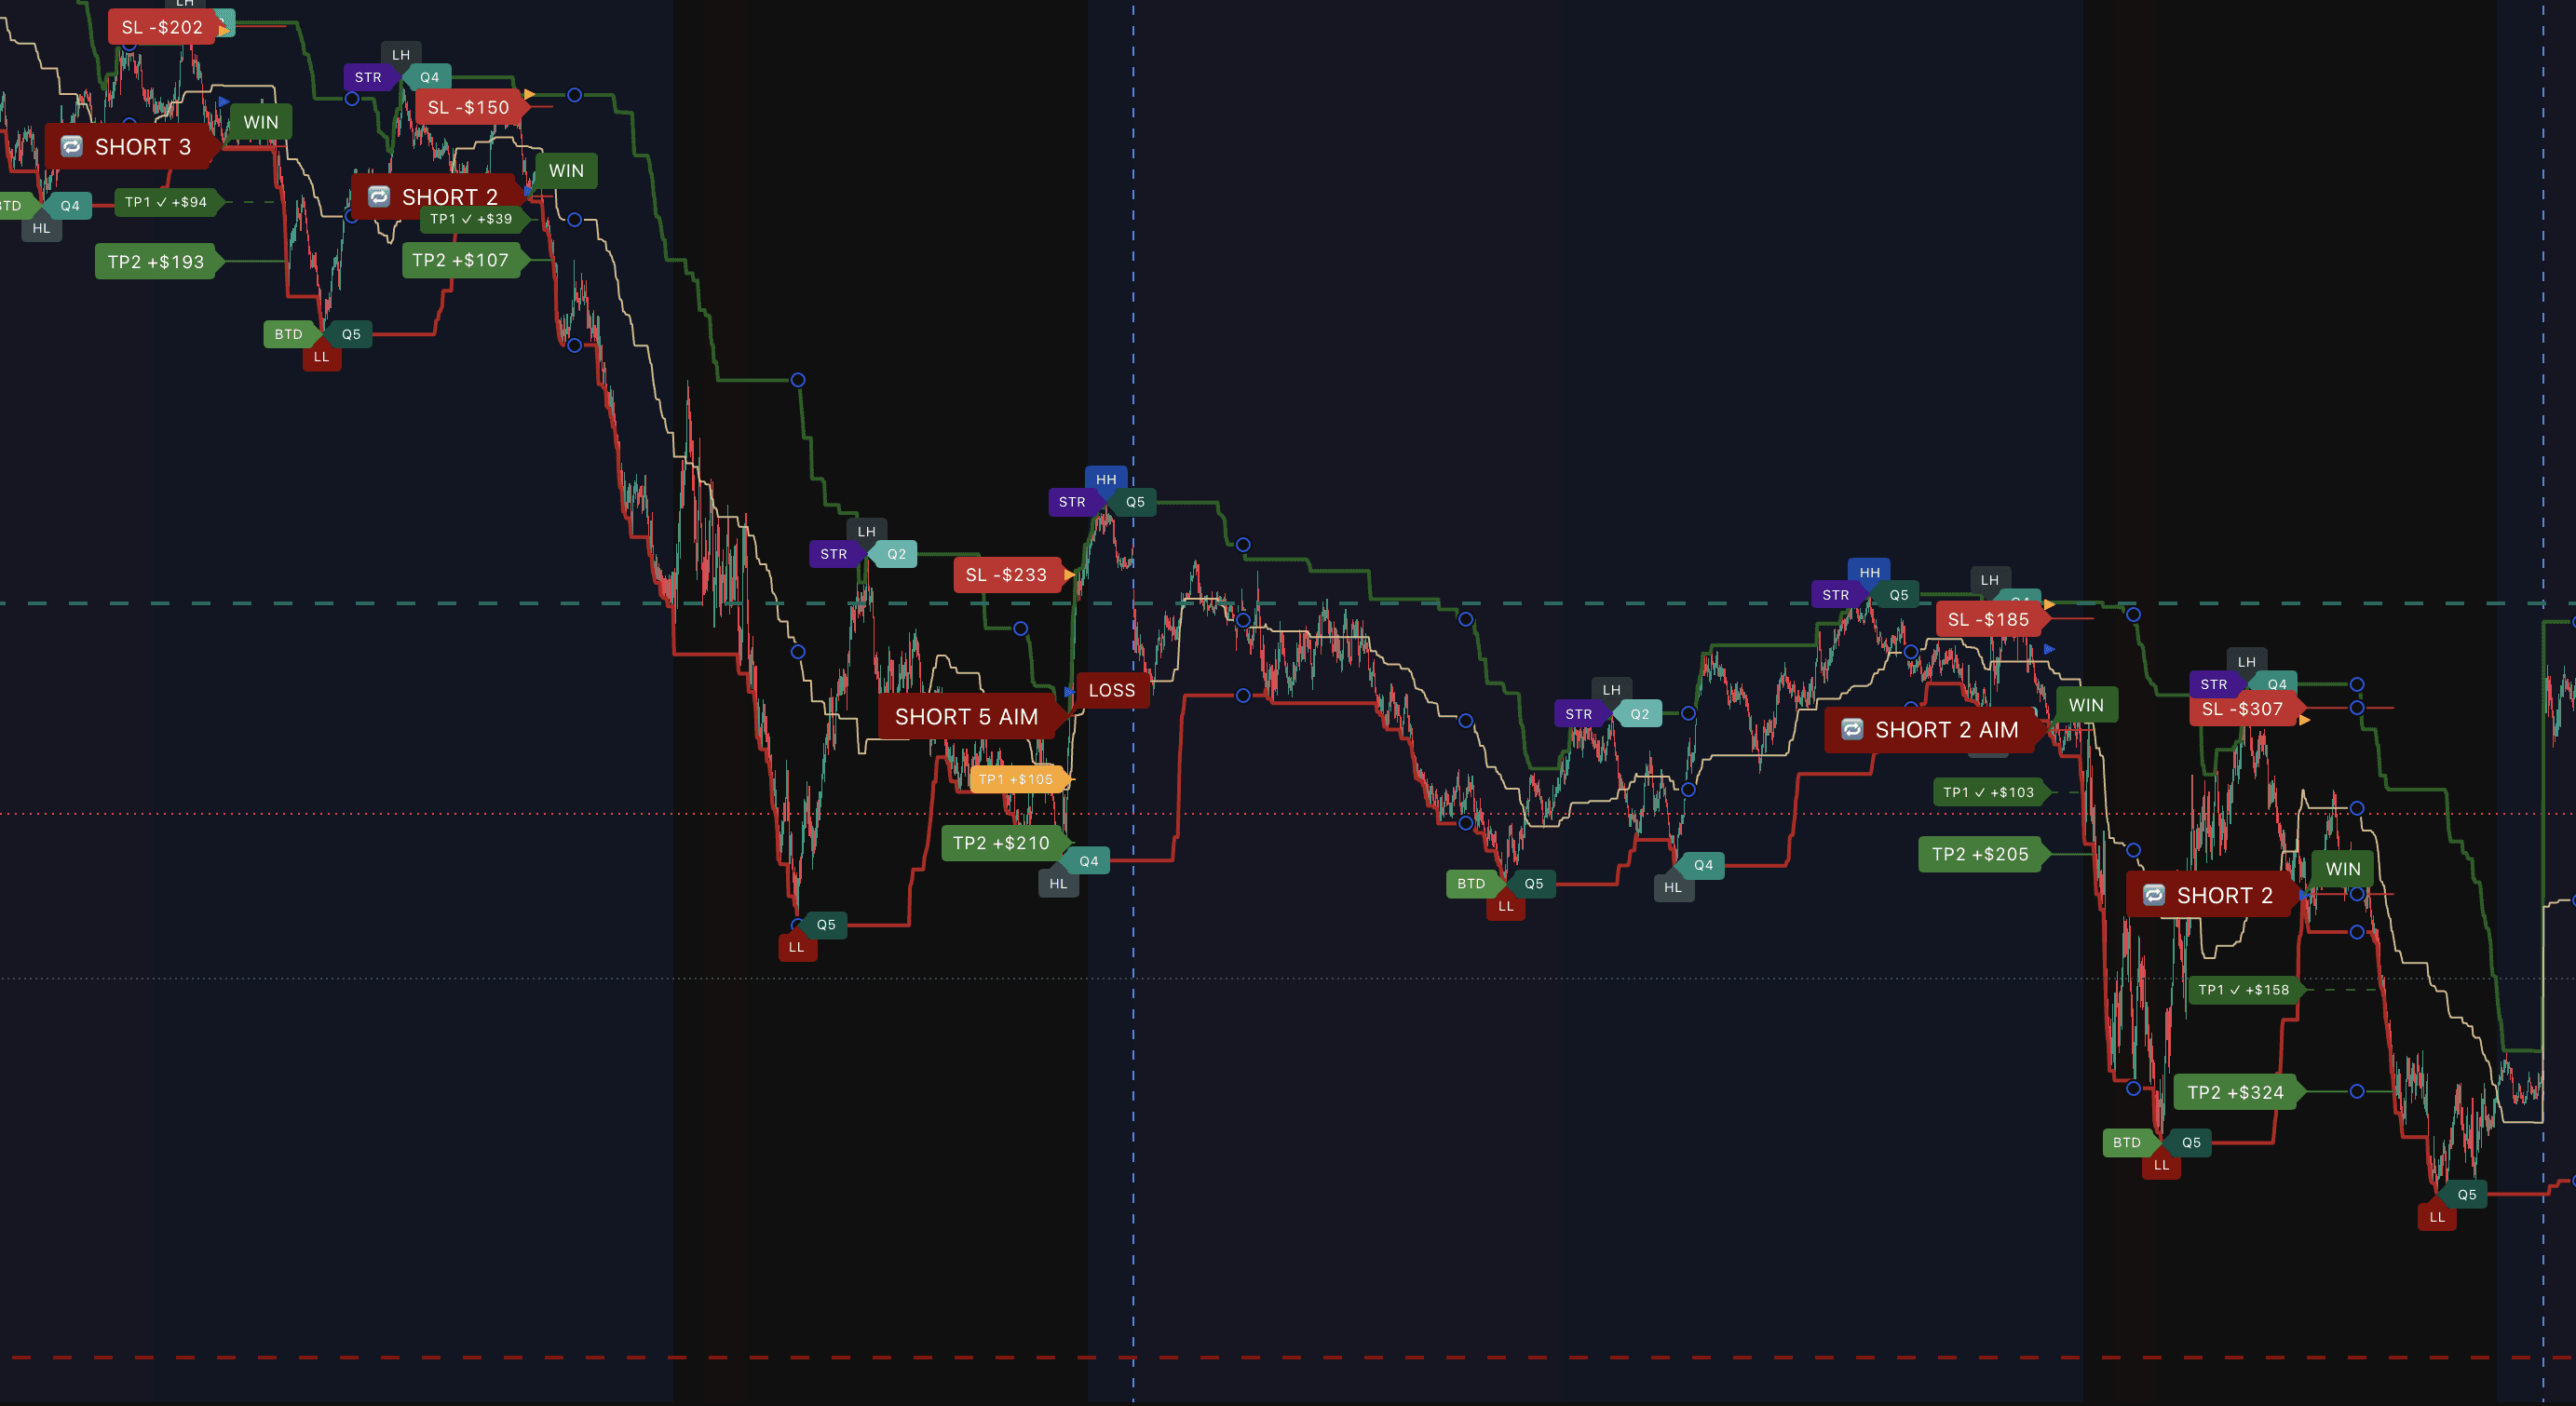
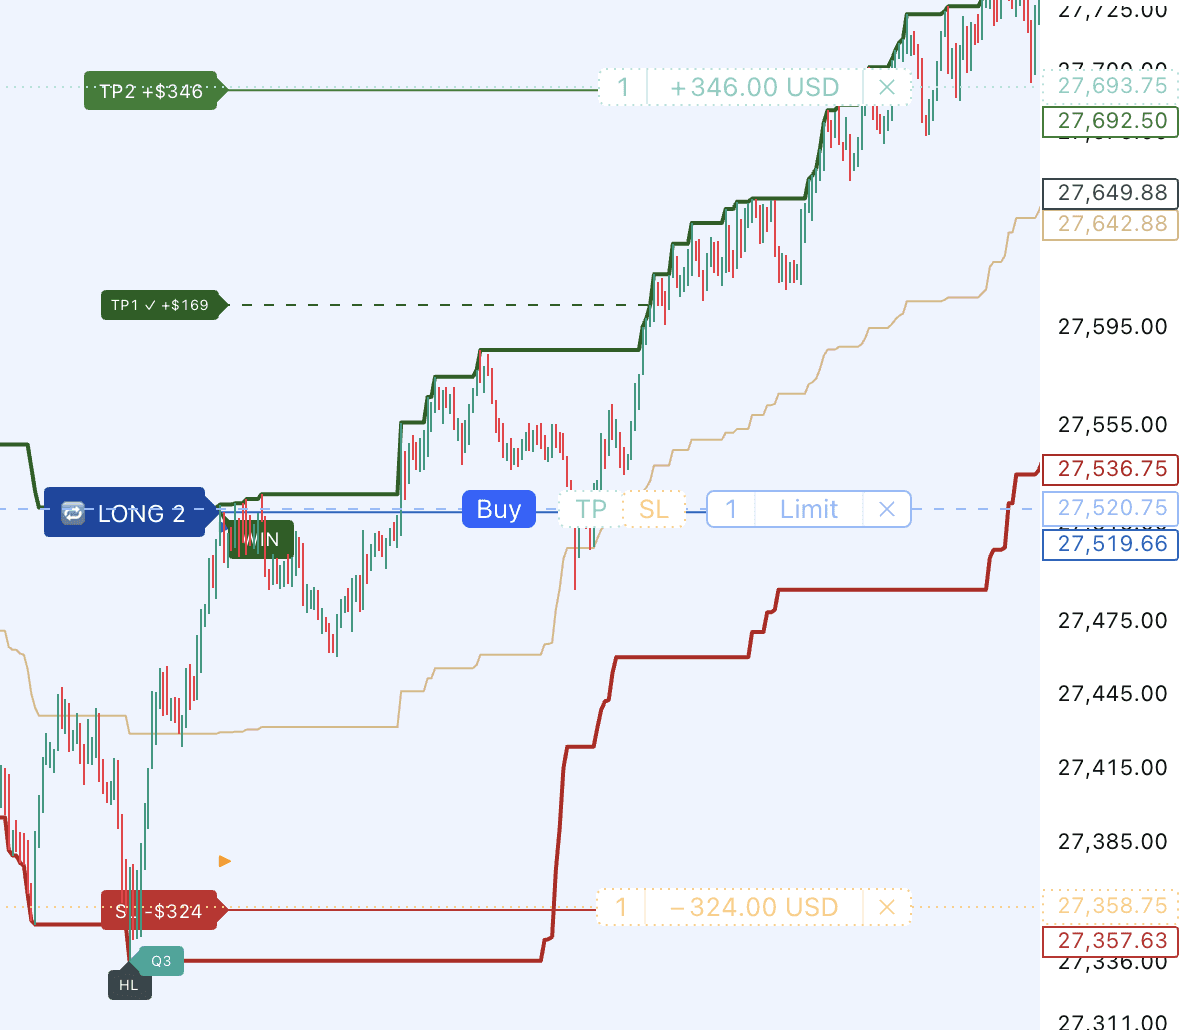
2.4TP1 / TP2 / SL — levels, lines, and $ labels#
At entry time, SulamX Pro draws the full trade plan:
- TP2 — the primary target, green label, with a dollar amount based on your reference position size.
- TP1 — an optional partial target part-way to TP2 (amber label; only drawn when Partial exit at TP1 is on).
- SL — the protective stop, red label, with its dollar amount.
- Dotted price lines at entry, TP2, and SL follow the trade while it's open and disappear when it closes.
The dollar figures on labels (and inside alerts) scale automatically with the Position Size (reference) setting.
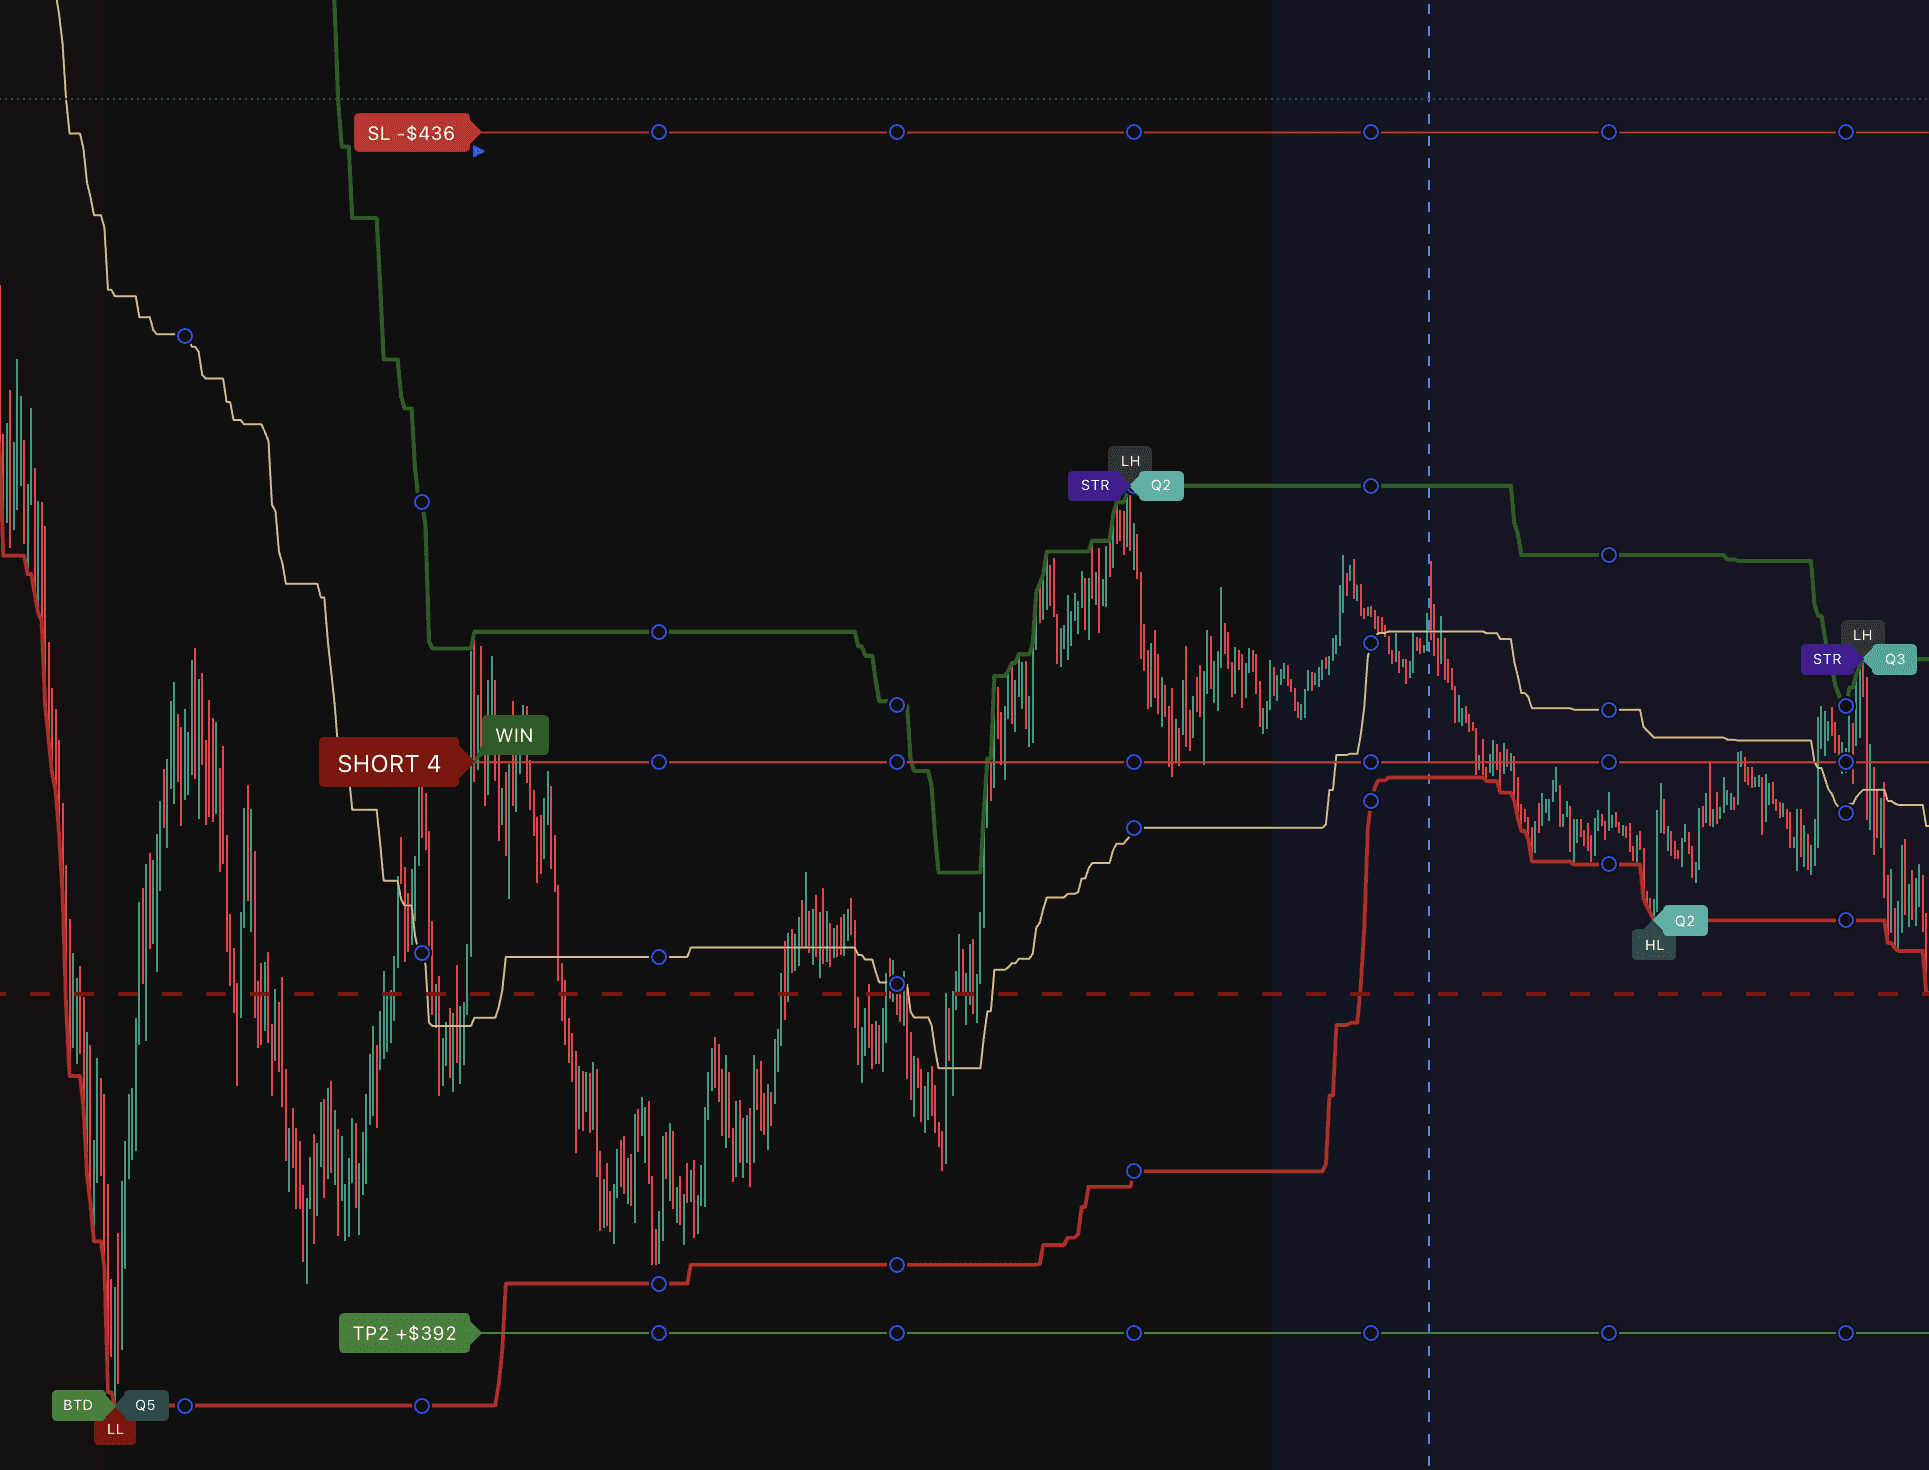
2.5TP1-hit recoloring#
When price reaches TP1, the amber TP1 label flips to dark green. Scrolling back through history, you can instantly see which trades reached their partial target — no digging required.
2.6The Break-Even (BE) tag#
With the Break-Even Stop option on, once price travels half-way to the target the stop jumps to the entry price (plus a small buffer) — so a full reversal closes the trade roughly flat instead of at a loss. The moment protection engages, an orange BE tag is drawn on the moved stop line.
If break-even protection was enabled but the trade ended before it could engage, a gray BE tag appears at the close — so you always know whether protection was active on that trade.
2.7WIN / LOSS chips#
When a trade finishes, a small chip is drawn next to the entry label:
- Win — dark green chip: the target was reached.
- Loss — dark red chip: the stop was hit.
- A break-even close (protected trade that returned to entry after banking TP1) gets no LOSS chip — the entry label keeps its live color and the BE tag tells the story.
Chips persist on the chart, so a quick scroll shows you the full historical record — wins, losses, and protected trades, exactly as they happened.
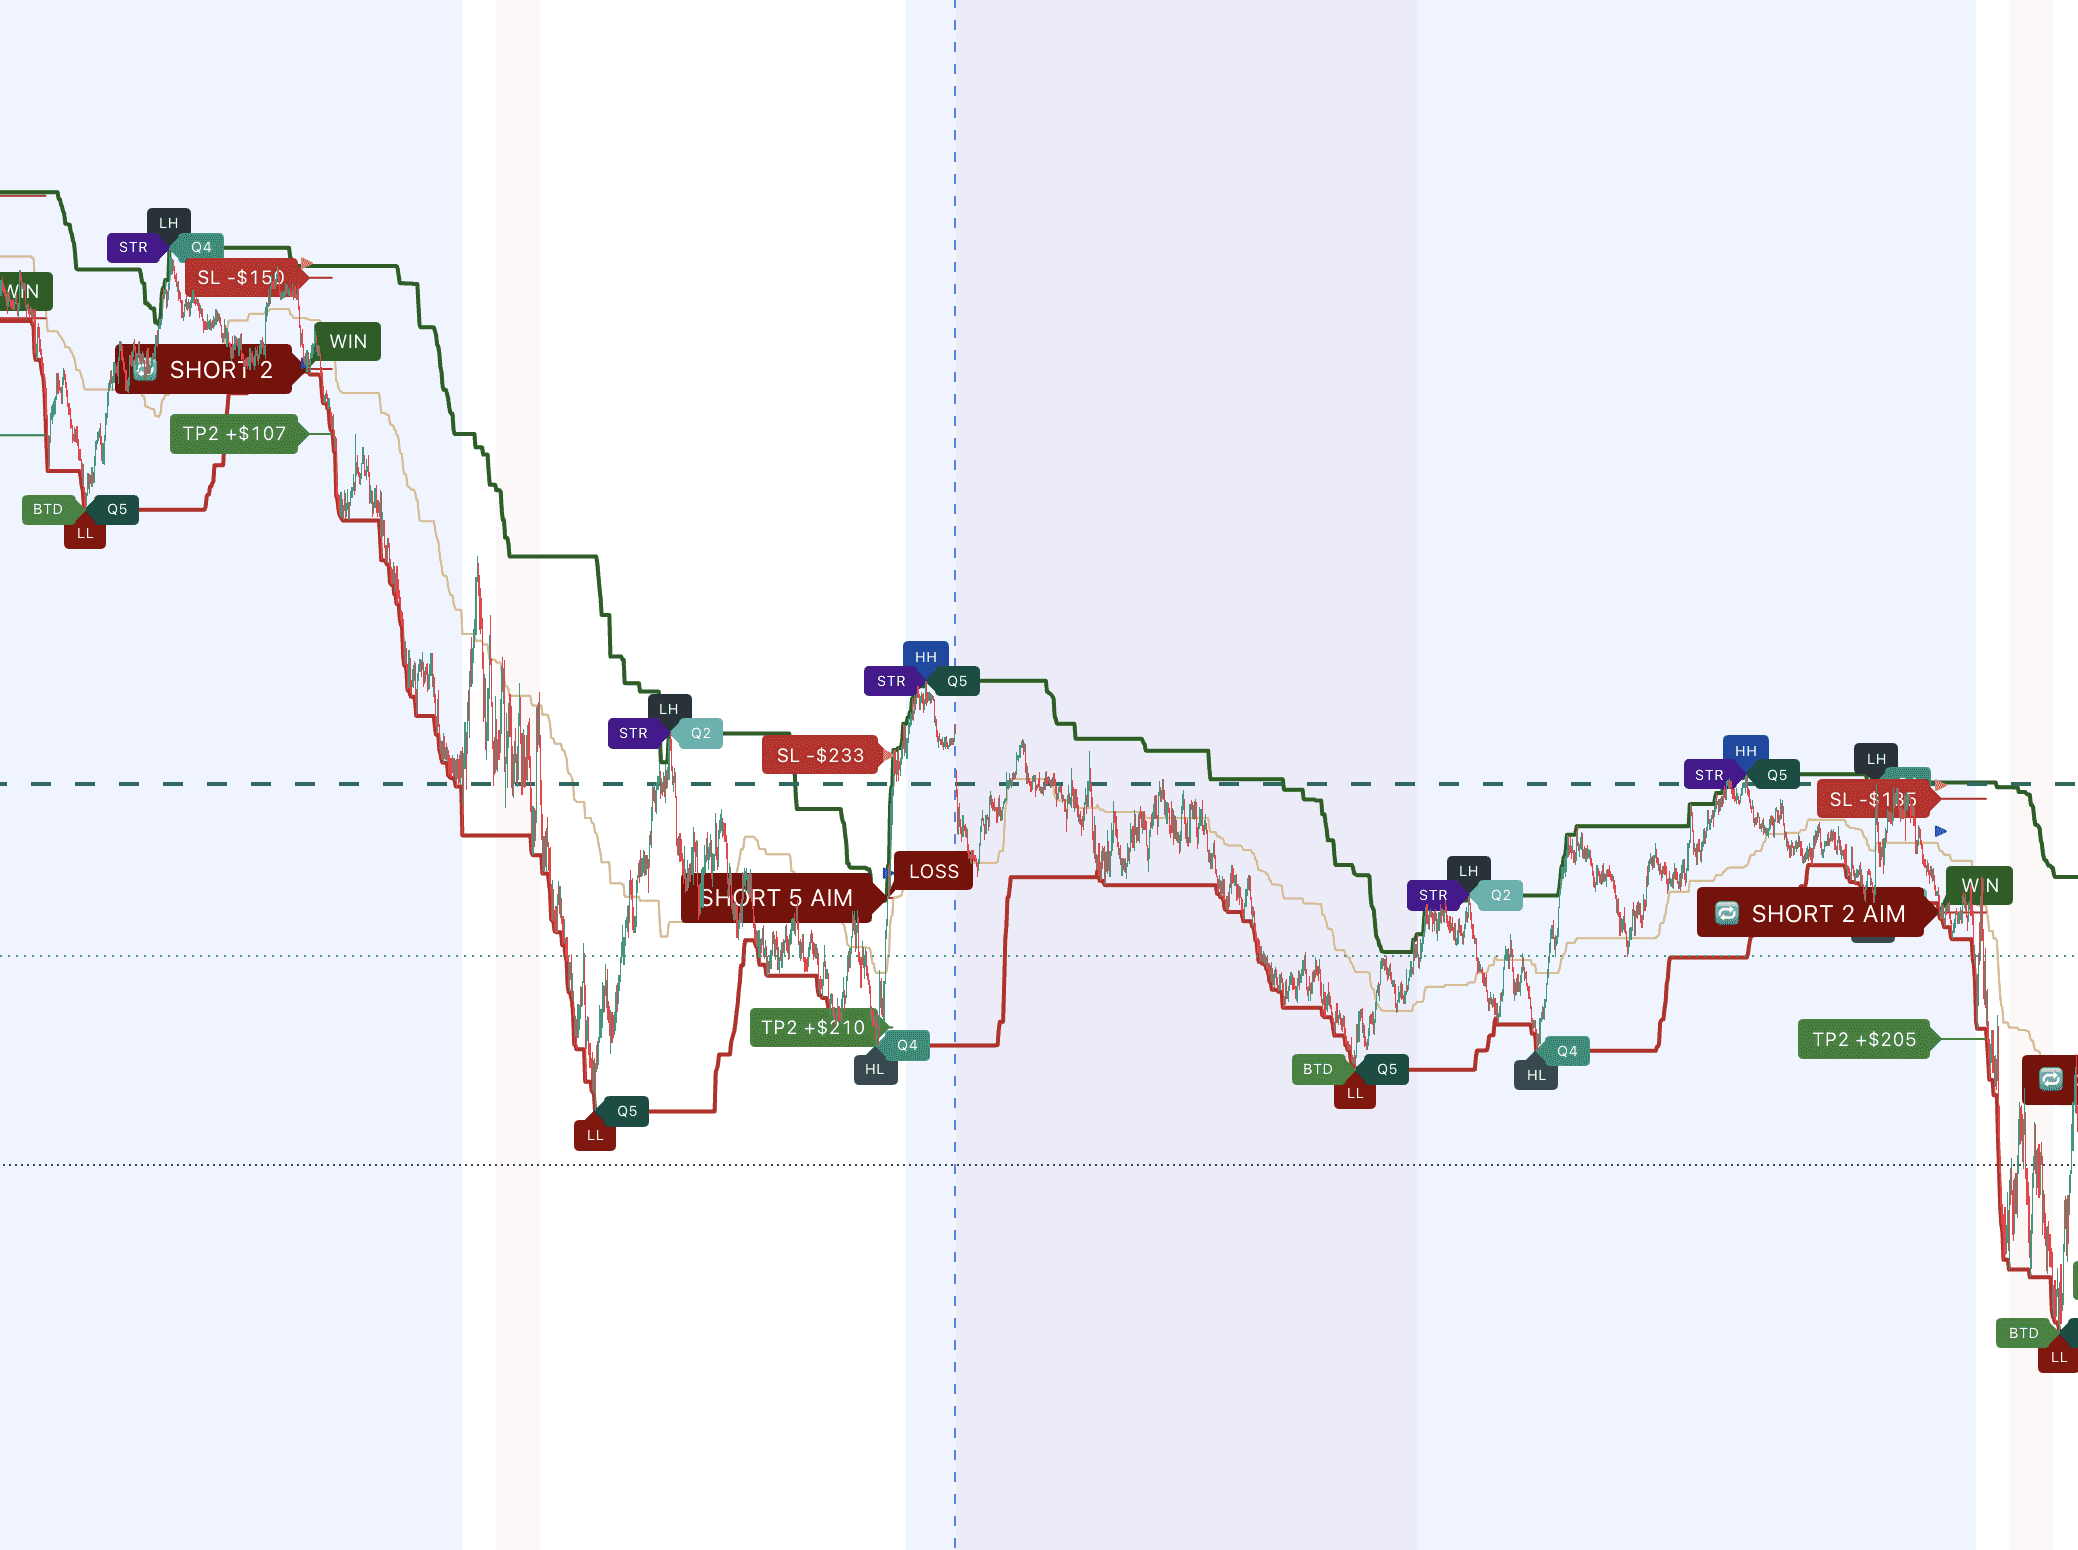
2.8The delayed-confirmation marker 🔄#
Occasionally an entry is confirmed only after the trend filter finishes settling. These entries carry a small 🔄 prefix on the label, and the label tooltip explains it. It's the same kind of entry — just confirmed on a short delay.
2.9Structure labels — HH / HL / LH / LL#
SulamX Pro continuously maps the market's structure:
- HH (Higher High) and LL (Lower Low) — structure breaks, the most important context.
- HL (Higher Low) and LH (Lower High) — retests and continuation points.
Next to each structure label, a compact Q-tag (Q1–Q5) grades the size of that structural move on a five-step scale — Q1 is the smallest, Q5 the largest (a full structural break). The Q-tags use progressively deeper shades of teal so you can read structural strength at a glance.
2.10Context labels — BTD / STR#
Two small context markers appear at meaningful pullback points:
- BTD ("Buy The Dip") — a swing low forming inside an upward context.
- STR ("Sell The Rally") — a swing high forming inside a downward context.
These are context only — they are not trade entries and open no position.
2.11Boundary lines and the structure channel#
- Structure channel — the upper and lower lines (plus an optional midline) that frame the current swing environment. This is the boundary structure the tool uses to confirm swings.
- Boundary lines — horizontal lines locked at the latest confirmed upper and lower structural extremes, with right-edge labels (Upper / Lower / Mid). They update on every new structure break and act as clean reference levels.
2.12Restricted-hours background shading#
During restricted trading windows (see Section 5), the chart background is tinted a soft red. Bars inside the tint are hours where new entries are filtered out. You always see exactly when the hours filter is active — nothing is hidden.
Alerts#
SulamX Pro's alerts are built essentials-first: the first line of every alert carries the heart of the message — result or direction, quality rating, size, and streak — so even a truncated phone push tells you what happened.
3.1Enabling alerts (one-time setup)#
- With SulamX Pro on your chart, click the Alert button (⏰) in TradingView's top toolbar — or press
ALT + A. - Under Condition, select SulamX Pro.
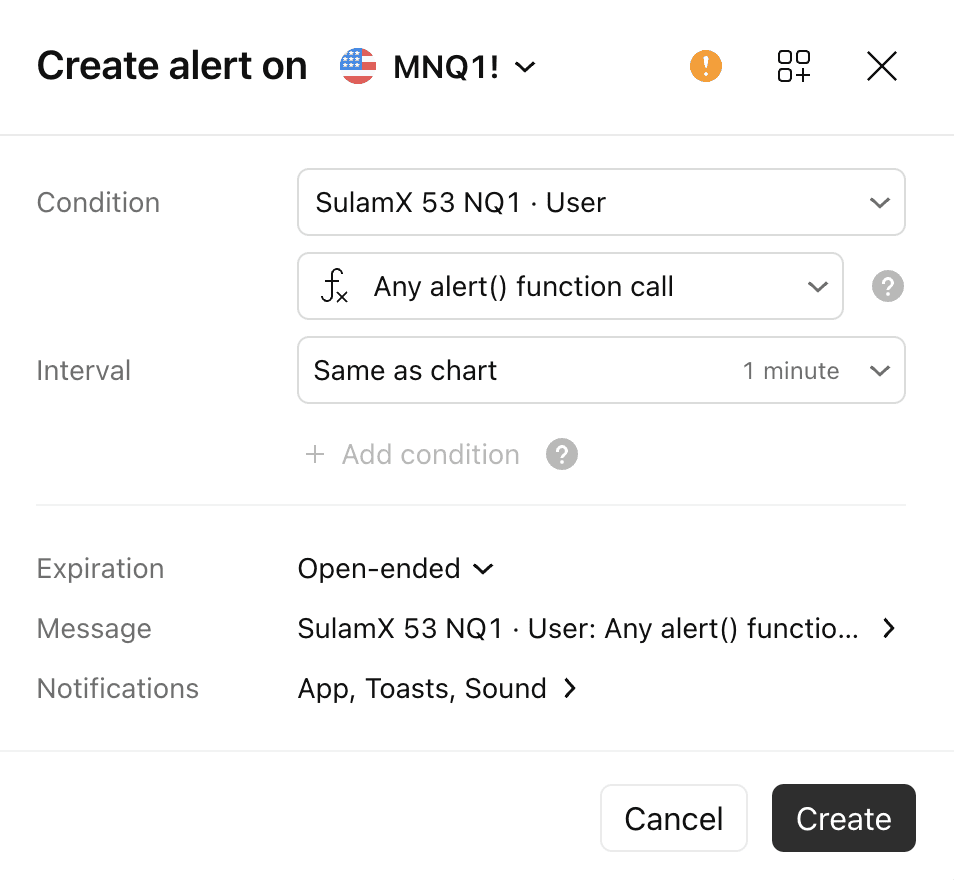
- In the second dropdown, select Any alert() function call. This single alert covers every event type — you do not need separate alerts per event.
- Set Expiration to Open-ended.
- In the Notifications tab, tick the channels you want: Notify in app (phone push), Show pop-up, Send email, Play sound.
- Click Create.
Which events actually fire is controlled inside SulamX Pro's own settings (group 9 — see Section 4.9), so you can change your alert mix any time without recreating the TradingView alert.
3.2The alert flow of a trade#
A typical trade produces this sequence (items marked optional are off by default — enable them in group 9):
- Context heads-up (optional) — a Dip-Buy or Rally-Sell zone alert, or a structure Breakout/Breakdown alert. Pure context; no position opens.
- ✅ New Trade — Long or Short: the confirmation process completed and a trade is on the chart. First line: direction, quality rating (stars plus Prime / Aim when present), and size. Detail lines: entry, TP1 (when active), TP2, and SL — each with its dollar amount — plus the current streak.
- 🎯 TP1 Hit (optional) — the partial target was reached and profit was banked; the message shows what was banked, whether the stop moved, and the remaining target.
- 🟠 Stop moved to Break-Even (optional) — protection engaged: the original stop, the new stop, and how much risk was removed. The moved stop carries its BE tag on the chart.
- 🏁 Trade Closed — Win, Loss or Break-even: the final word. First line: result and amount, direction, quality, and streak. Detail lines: points, entry → exit prices, in/out times, duration, and contracts.
The direction line of an entry alert may also carry a context note — for example (Dip-Buy) or (Continuation) — telling you which kind of setup produced it.
3.3Getting alerts on your phone#
- Install the TradingView app (iOS / Android) and sign in to the same account.
- In the app: Menu → Settings → Notifications — make sure push notifications are enabled for alerts.
- In each alert's Notifications tab on desktop, tick Notify in app.
That's the whole setup. From then on, every enabled event lands on your lock screen with the essentials in the first line.
3.4Creating an alert, click by click#
You need one alert. It covers every event the indicator sends — entries, targets, stops and results — because SulamX Pro packs them into a single alert condition.
- Make sure SulamX Pro is on the chart first. An alert can only be built on an indicator that is loaded.
- Right-click the indicator name in the chart legend (top-left of the chart) and choose Add alert. This is the shortcut worth learning — it pre-fills the condition for you. The alternatives are
Alt+Aon Windows,Option+Aon Mac, or the alarm-clock icon in the right-hand toolbar. - In Condition, confirm SulamX Pro is selected. If you opened the dialog from the toolbar instead, pick it from the dropdown now.
- Set Trigger to Once per bar close. This is the important one — it stops an alert firing repeatedly while a candle is still forming.
- Under Expiration, choose Open-ended if your plan offers it. If it does not, note the expiry date — the alert stops firing silently when it passes.
- Give it a name you will recognise, for example
SulamX Pro — MNQ 1m. - Open the Notifications tab and tick Notify on app for phone push. Add Show pop-up if you want it on screen, and Send email as a backup.
- Press Create. A small alarm icon appears next to the indicator name — that is your confirmation it is live.
One more habit worth having: create the alert on your phone if you can. Alerts created in the mobile app have push notifications enabled by default; alerts created on desktop do not, and the box has to be ticked manually.
3.5Pausing, editing and deleting an alert#
Everything happens in the Alert manager — the alarm-clock icon in the right-hand toolbar of the chart.
| What you want | How |
|---|---|
| Pause it for a while | Hover the alert row and press Stop. It stays in the list and can be resumed. |
| Delete it permanently | Hover the alert row and press the delete control — or right-click the row (long-press on mobile) and choose Delete. This frees the slot. |
| Change something | Double-click the alert to open its Edit panel. Remember the gotcha above: settings changes need a fresh alert, not an edit. |
| Find it on the chart | Alerts appear as a marker on the price scale; double-click the marker to edit, or drag it to move the level. |
Housekeeping worth doing once a month: delete alerts you no longer use. A stopped alert still takes up one of the slots your plan allows, and TradingView deactivates anything created over a year ago that has not fired in a year.
Settings Walkthrough#
Open the settings by double-clicking any SulamX Pro element on the chart, or via the gear icon next to the indicator's name. Settings are organized into nine groups.
Defaults are the validated configuration — everything below is explained so you can tailor the display, not because anything needs changing.
4.1Group 1 — Trade Setup#
The core display of entries and their levels. In the settings panel this group is listed as Group 1 — Chart Events & Trade Setup. A chart event is a price range that SulamX Pro has marked because the conditions it looks for are present — a description of the chart, not a recommendation. SulamX Pro does not tell you what to buy or sell, does not forecast, and nothing it draws is a trade instruction. What you do with the information is entirely your decision.
| Setting | Default | What it does |
|---|---|---|
| Trade Type | Long and Short | Restrict the tool to one direction if you only trade one way. |
⚡ Enable Chart Events (master) | ON | The master switch for the whole engine. OFF = no entries, no labels, no alerts. |
| Entry Label Size / Colors | normal / blue & red | Size and colors of the LONG/SHORT labels, including the darker "closed" shades. |
| Show TP / SL Labels | ON | The TP2 and SL labels at entry time, plus the dashed stop line that follows the trade. |
| 🔻 Shrink oversized trades into a $ band | OFF | Optional personal-preference tool: pulls both target and stop inward on unusually large setups so trade sizes stay in a consistent dollar band, with reward-to-risk unchanged. The threshold and shrink % below it apply only when this is ON. |
| Show Price Lines (entry/SL/TP) | ON | The dotted lines at entry / TP2 / SL while a trade is open. |
| 🆕 Highlight Closed Trades (WIN/LOSS chip) | ON | The WIN / LOSS chips from Section 2.7. |
| Show Entry Range | ON | Two small arrow lines marking the entry price and an inner reference level. |
| Arrow Range Filter | ON | A safety check: cancels an entry if its entry-range reference sits beyond the stop level. |
4.2Group 2 — Trade Management: Partial TP1 / BE#
Two functional switches plus their visuals.
| Setting | Default | What it does |
|---|---|---|
| Partial exit at TP1 | OFF | The trade runs as two units: one banks profit at TP1, the other runs on to TP2. Draws the TP1 level and label. |
| Break-Even Stop | OFF | Once price travels half-way to the target, the stop jumps to entry (plus a small buffer) and a BE tag marks the move. Works with or without Partial TP1. |
| TP1 Label Size / Color / Hit Recolor / Hit Color | tiny / amber / ON / dark green | The TP1 marker's look, including the recolor-on-hit behavior from Section 2.5. |
| TP1 placement (% of the way to target) | 50 | Where TP1 sits between entry and TP2. 50 = half-way (validated default). |
| BE Label Size / Color | tiny / orange | The BE tag's look. |
4.3Group 3 — Contract & Position#
| Setting | Default | What it does |
|---|---|---|
| Position Size (reference) | 1 | The reference size behind every dollar amount on labels and in alerts. Change it and all figures — including historical ones — recompute automatically. With Partial TP1 ON, a live size of 2 × this value matches the display (one unit exits at TP1, one runs). SulamX Pro is an indicator: it never places orders. |
4.4Group 3b — Dynamic Contracts (auto-size 1→5)#
| Setting | Default | What it does |
|---|---|---|
| ⚖️ Enable Dynamic Contracts | OFF | When ON, each entry is assigned a suggested size from 1 to 5 based on its quality tier — ordinary setups stay at the base size, and only the rare top-tier setups reach the larger sizes. Which setups appear never changes; only the suggested size does. |
| Contracts · Tier 1 ★ … Tier 5 ★★★★★ | 1 / 2 / 3 / 4 / 5 | The suggested contract count per quality tier. Most setups land in the lower tiers, so the average stays small. |
When Dynamic Contracts is on, entry labels show the size (e.g., LONG 5 PRIME x5), and you can choose whether alert dollar amounts follow the sizing (group 9).
4.5Group 4 — Direction Filters (Active)#
The direction filter itself is always on — it is the heart of the confirmation process and has no off switch. This group controls only its display:
| Setting | Default | What it does |
|---|---|---|
| Show Blue Line (trend reference) | OFF | Draws the trend-reference line on the chart: LONG-friendly above it, SHORT-friendly below. Off by default for a cleaner chart. |
| Blue Line Color / Width / Smoothness | navy / 2 / 20 | Visual styling. Smoothness is display-only and never affects the filter logic. |
4.6Group 5 — Trading Hours#
See Section 5 for the full explanation. In short: a master switch, three built-in restricted windows, an optional manual window, and the background shading toggle.
4.7Group 6 — Display & Labels#
Everything about the structure map:
- HH / LL Labels (ON) and HL / LH Labels (ON) — the structure labels from Section 2.9, with independent size controls and per-label colors.
- Breakout / Breakdown Labels (OFF) — an extra label when a new structural high exceeds the previous one (and the mirror case).
- Show BTD/STR (ON) — the context labels from Section 2.10.
- Show Momentum Markers (OFF) — small squares marking the first push after a flat period at a structure boundary.
Fibonacci % on Labels(OFF) — a legacy numeric readout on structure labels. The Q-tags below are the modern replacement; both can be on together.- 🆕 Show Q-tags on Labels (Q1..Q5) (ON) — the five-step structural-strength tags, with size and five color controls.
- Show PRIME / AIM tag on entry labels (ON) — Section 2.3.
- Show Quality Meter (1–5 ★) on entry labels (ON) — Section 2.2.
- Show Structure Channel (ON) + Channel Midline (ON) — Section 2.11, with colors.
4.8Group 7 — Boundary Lines (and Group 8 — Arc)#
- Boundary Lines (ON), Boundary Midline (ON), Boundary Labels (ON) — the locked horizontal levels from Section 2.11, with width and color controls.
- Arc (OFF) — an optional curved trend cloud (fast vs. slow trend read) for visual context. Purely decorative; most users leave it off.
4.9Group 9 — Alerts#
Which events fire (all of them still require the one TradingView alert from Section 3.1):
| Toggle | Default |
|---|---|
| 🔔 Enable All Alerts (master) | ON |
| ✅ New Trade (LONG / SHORT) | ON |
| 🏁 Trade Closed (WIN / LOSS / Break-Even) | ON |
| $ amounts follow Dynamic Contracts | OFF (amounts are per one contract) |
| 🎯 TP1 Hit (partial exit) | OFF |
| 🟠 Stop moved to Break-Even | OFF |
| 📈 Zone Context (Dip-Buy / Rally-Sell) | OFF |
⛔ Event Skipped (restricted hour) | OFF |
| 🕐 Restricted-Hours Window opens / closes | OFF |
| 🚀 Structure Breakout / Breakdown | OFF |
| 🌍 Alert Timezone | UTC+2 / UTC+3 |
Set the Alert Timezone to match your chart so timestamps in messages agree with what you see.
The Trading-Hours Filter#
Not all hours are equal. SulamX Pro ships with a trading-hours filter that skips new entries during windows that historically produced lower-quality conditions.
It is on by default, fully visible, and fully under your control.
5.1The built-in windows#
All times are UTC+2/+3, exactly as shown in the settings. A live economic calendar and the full session-hours table are on our free market tools page.
| Window | Default | Why |
|---|---|---|
| 17:00–17:40 daily | ON | A scheduled window that historically produced lower-quality conditions. |
| Wednesday 20:30–21:30 | ON | The weekly contract-change window — historically erratic. |
| Night 00:00–08:00 | ON | The overnight session — thin liquidity. |
5.2What you see and control#
- The chart background is tinted soft red during any active window (Section 2.12), so filtered hours are always visible.
- The master switch (Enable Trading Hours Filter) turns the whole system off if you prefer unfiltered operation.
- A Manual Blocked Range lets you add one custom window of your own (format
HHMM-HHMM). Note that a range crossing midnight blocks the long way around — for overnight use0000-0800or the built-in Night toggle. - An optional morning toggle (08:00–12:00) is available for users who want a quieter morning; most entries are unaffected either way.
- Two opt-in alerts keep you informed.
⛔ Event Skipped (restricted hour)tells you when a chart event was filtered, and🕐 Restricted-Hours Window opens / closesannounces the schedule itself.
Nothing is deleted or hidden: a filtered event simply doesn't become a trade, and you can audit every skip.
Trading From the Chart#
SulamX Pro shows you structure. Acting on it is your decision — this chapter covers the mechanics of how orders actually get placed.
6.1Two ways to place an order#
Once a broker is connected to TradingView you have two routes, and they are not equally fast.
| Route | How it works | Speed | Best for |
|---|---|---|---|
| From the chart | Drag an order line to the price you want, set the size, click buy or sell. Take-profit and stop brackets are dragged on the chart too. | Fastest — the price is where your cursor already is | Acting on something you can see |
| From the order ticket | Open the ticket in the Trading Panel and type the symbol, side, size and prices by hand. | Slower, more deliberate | Pre-planned or resting orders |
We recommend the chart route. When the level you care about is already drawn in front of you, putting the order on that level is one drag instead of four fields — and fewer typed numbers means fewer typos on a live position.
TradingView calls the on-chart version an order projection: the order exists only on the chart until you confirm it, so you can move it, resize it, switch it between limit, stop and stop-limit, and attach brackets before anything is sent. Press Esc to throw it away.
Order types available: Market fills immediately at the best available price; Limit rests and fills only at your price or better; Stop sends a market order once a trigger price is reached; Stop-limit sends a limit order at that trigger.
6.2Connecting a broker#
On the chart, press Trade in the top toolbar, or open the Trading Panel at the bottom of the screen. TradingView shows the brokers available in your region — more than a hundred of them — and connecting is a login inside that panel.
We list brokers that support CME futures on our setup page. To be completely clear: we are not affiliated with any of them, we receive nothing if you sign up, and which broker you choose has no effect on your SulamX Pro subscription. Availability depends on your country.
6.3On your phone#
The TradingView mobile app runs the same chart, the same indicator and the same broker connection. Settings and watchlists sync across web, desktop and mobile automatically.
- Connect a broker: open the chart tab, tap the trade button in the toolbar, then tap the broker card to log in.
- Place an order: tap the Buy or Sell buttons on the chart. If “instant order placement” is on, the order goes immediately with no confirmation screen — check that setting under the gear icon → Chart Settings → Trading before you use it in a live account.
- Adjust an order: tap it once to select, then drag it.
Support & Ground Rules#
What comes with your subscription beyond the indicator, and a short discipline checklist for anyone who is new to this.
7.1Support#
Support is by email, from the address you subscribed with, and it covers the tool itself: access and licensing, installing SulamX Pro on your chart, alerts, data and timezone problems, and questions about what a marking on the chart means.
- Product updates. New releases, changes to settings and fixes — anything that affects how the tool behaves on your chart — are announced by email.
- Setup and technical help. Access, alerts, market data, chart configuration.
- Reading the chart. What a marking means and how a setting changes the display.
Write to info@sulamx.com from the address you subscribed with.
7.2Nine rules if you are new#
None of this is financial advice — it is operational discipline. If you have never traded before, read it twice.
- Fix your data first. Delayed data makes every alert worthless. Chapter 0.3.
- Change nothing. The defaults are the settings we use. Add the indicator, create one alert, and leave the configuration alone until you understand what each control does.
- Watch before you trade. Spend a week reading the marks on a demo account. You are learning a visual language; do that with no money on the line.
- One market, one timeframe. Nasdaq-100 futures on the 1-minute chart. Do not spread yourself across symbols while you are learning.
- Smallest possible size. The micro contract exists for exactly this. Size up only after months, never after a good week.
- Decide your stop before you enter. The stop is drawn on the chart at entry. Place it with the order — not later, not mentally.
- Losses are part of the record. Both wins and losses stay on the chart permanently, on purpose. A losing mark is not a malfunction.
- Do not chase a late alert. If the price has already moved past the level by the time you look, that one is gone. There will be another.
- Stop for the day when you said you would. Decide the number before the session, not during it.
7.3What we are — and are not — responsible for#
| Area | Who handles it |
|---|---|
| The indicator: what it draws, what it sends, keeping it working | SulamX |
| Granting and removing your access to the script | SulamX |
| Billing, invoices, refunds and cancellation | SulamX Ltd — payments processed by our payment provider. Contact info@sulamx.com for billing, cancellation or refund assistance. |
| Your TradingView account, plan, login and platform bugs | TradingView |
| Market data, delays, outages and data subscriptions | TradingView / your exchange |
| Your broker account, margin, fills, slippage and statements | Your broker |
| The decision to place any trade, and its outcome | You |
Full terms are in our Terms of Service and Risk Disclaimer. Trading futures involves substantial risk of loss and is not suitable for every investor.